
As a writer, I use the writing process every single day — when writing a blog post for this or another site, when texting, Facebooking, or when responding to a writing prompt I have given to my students. It’s a process I internalized through many years of writing in school, but was never really taught explicitly, unless you count the required notecards and outlines from high school English. (Yes, I despised those, too.)
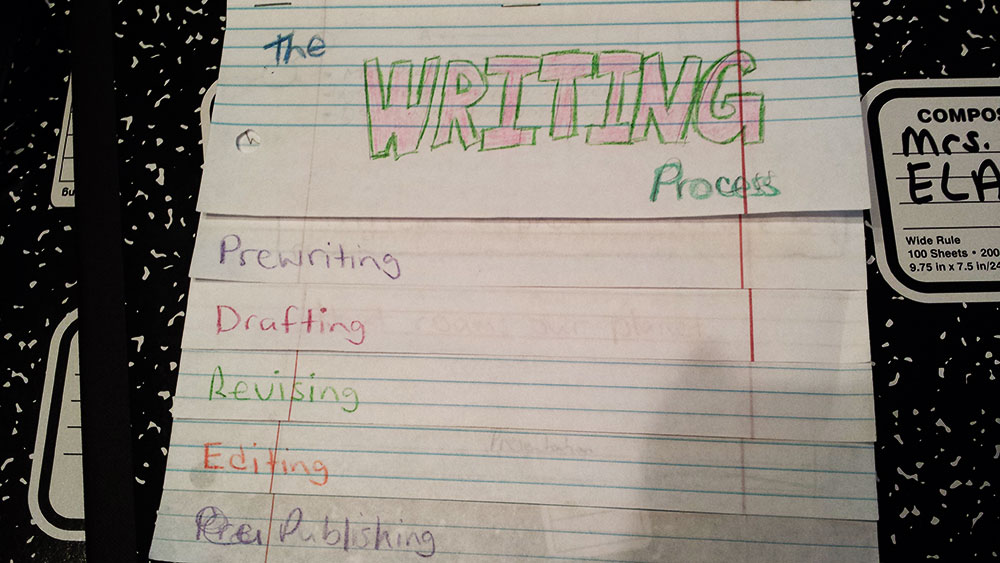
Fortunately, we’ve come along way, in that teachers introduce the writing process much earlier, and we teach and guide students through each step in real writing projects. For this reason, I decided to equip my students with their own reference materials, in the form of a nifty flip chart, as you can see above. Students will be able to reference this chart in their Interactive Notebooks throughout the year in my English Language Arts class.
Instructions
Provide students with three sheets of notebook paper. The students will set the bottom sheet on their desktop in landscape format (the top of the paper pointed towards the right). The next sheet of paper should be placed on the top, offset to the right by about three lines on the notebook paper. The third sheet should be offset by the same amount. Then fold all three sheets of paper to the left, with the top sheet’s edge offset from the left edge by three lines, so that way end up with five tabs, plus the cover on top.
Students should label the cover “The Writing Process.” The tabs should be labeled in the following order:
- Prewriting
- Drafting
- Revising
- Editing
- Publishing
Once you have labeled your tabs, you’ll need to add the notes and examples to each section.
Prewriting
Include the following notes above the fold, and the examples below the fold, on the prewriting tab. You can click on the graphic to see the notes and examples. Prewriting is the step in which students research their topic, purpose, and audience. Students brainstorm, and organize their ideas on paper in a linear or organic manner. In this flip chart, our example prewriting methods include a web (also known as a bubble map or mind map), an outline, and a four square. We’ll discuss and use each of these prewriting methods throughout the year.
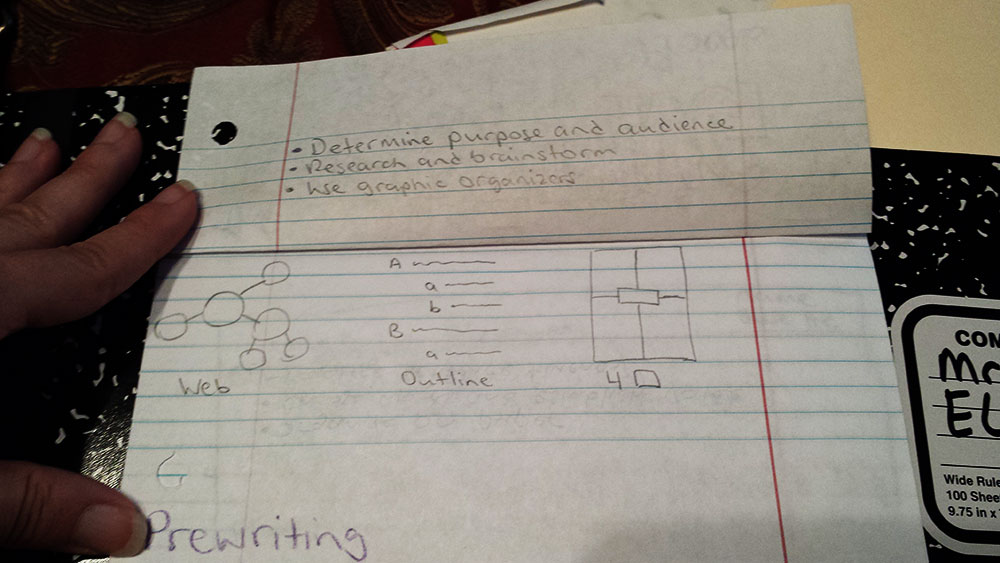
Students often don’t understand that prewriting is a process that even published writers use. Perhaps they think it’s a device conjoured by English teachers bent on torturing them? I plan to help students see the value in prewriting by showing them examples of famous author’s prewriting processes.
- 60 Minutes Interview: J.K. Rowling on Plotting Potter (video)
- Sample of J.K. Rowling’s plot spreadsheet
- Debra Frasier discusses how she gets her ideas (video)
Drafting
In the drafting phase, students organize their thoughts in paragraph format, making sure to choose their words and sentence format carefully. While some teachers stress that students must prewrite first, then draft, I have found that students often balk at that methods. I recommend students blend these first two steps: Students can start out drafting, as needed, then use one of the prewriting methods to visualize and analyze their work. Then switch back to drafting, and sometimes on to revising.
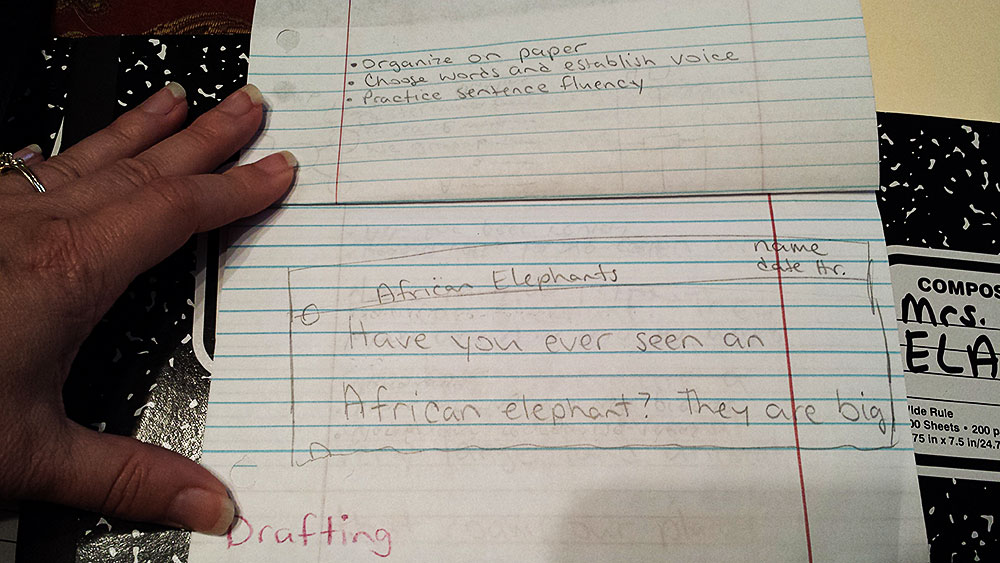
This is step students automatically think of when they think about the writing process. Many students think that you only have to draft, and then move on to the next assignment. My goal is to help students understand that the process is much more complex, and will result in much better writing.
Revising
While this is one of the most important steps of the writing process, it’s also the one students most resist. For some reason, students often think that they can do their best work in just one draft. As an experienced writer, I know that this cannot be further from the truth. One of my goals this year is to teach my students how to peer review, as seeing how other students write, and helping their peers improve their writing will help inform students’ own writing.
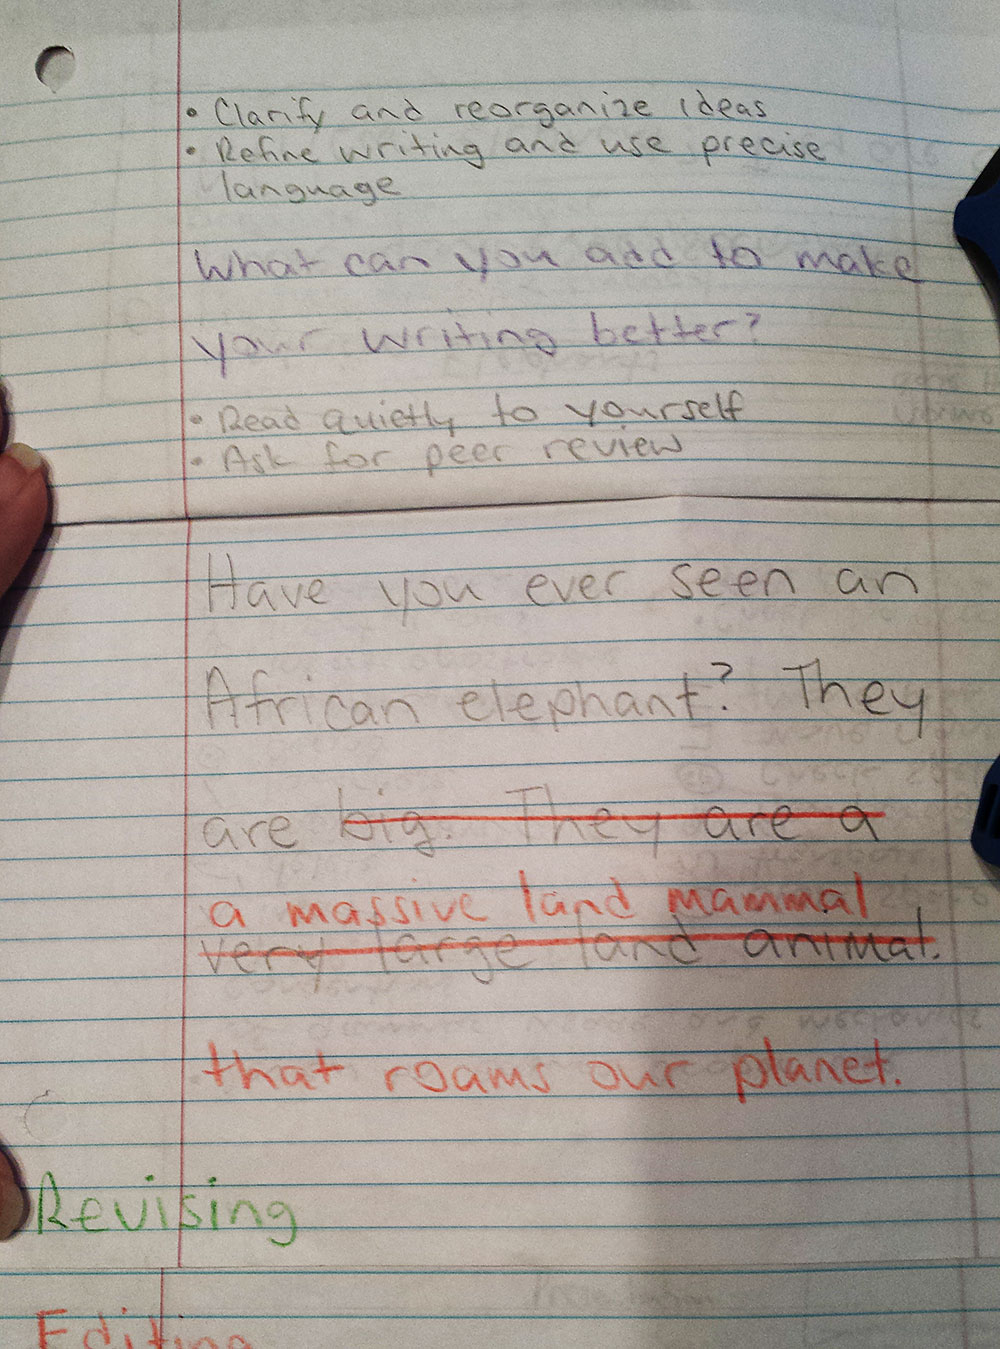
I also plan to show students published authors who talk about their revision process.
Kate DiCamillo discusses revisions of Winn-Dixie (video)
Editing
This is the stage at which writers find grammatical, usage, and mechanical errors in their writing. While some teachers blend this step with the revision step, I think it’s important to distinguish between the two. Students must understand the significance of evaluating their content (revision) outside of just looking for errors. I also know that students (and often their teachers *ahem*) can get so bogged down in the editing phrase, that they never make it out of the drafting stage. It’s important to focus on writing, then revising, and then worry about editing. The editing page includes proofreader marks students can use on their own papers, and when peer editing.
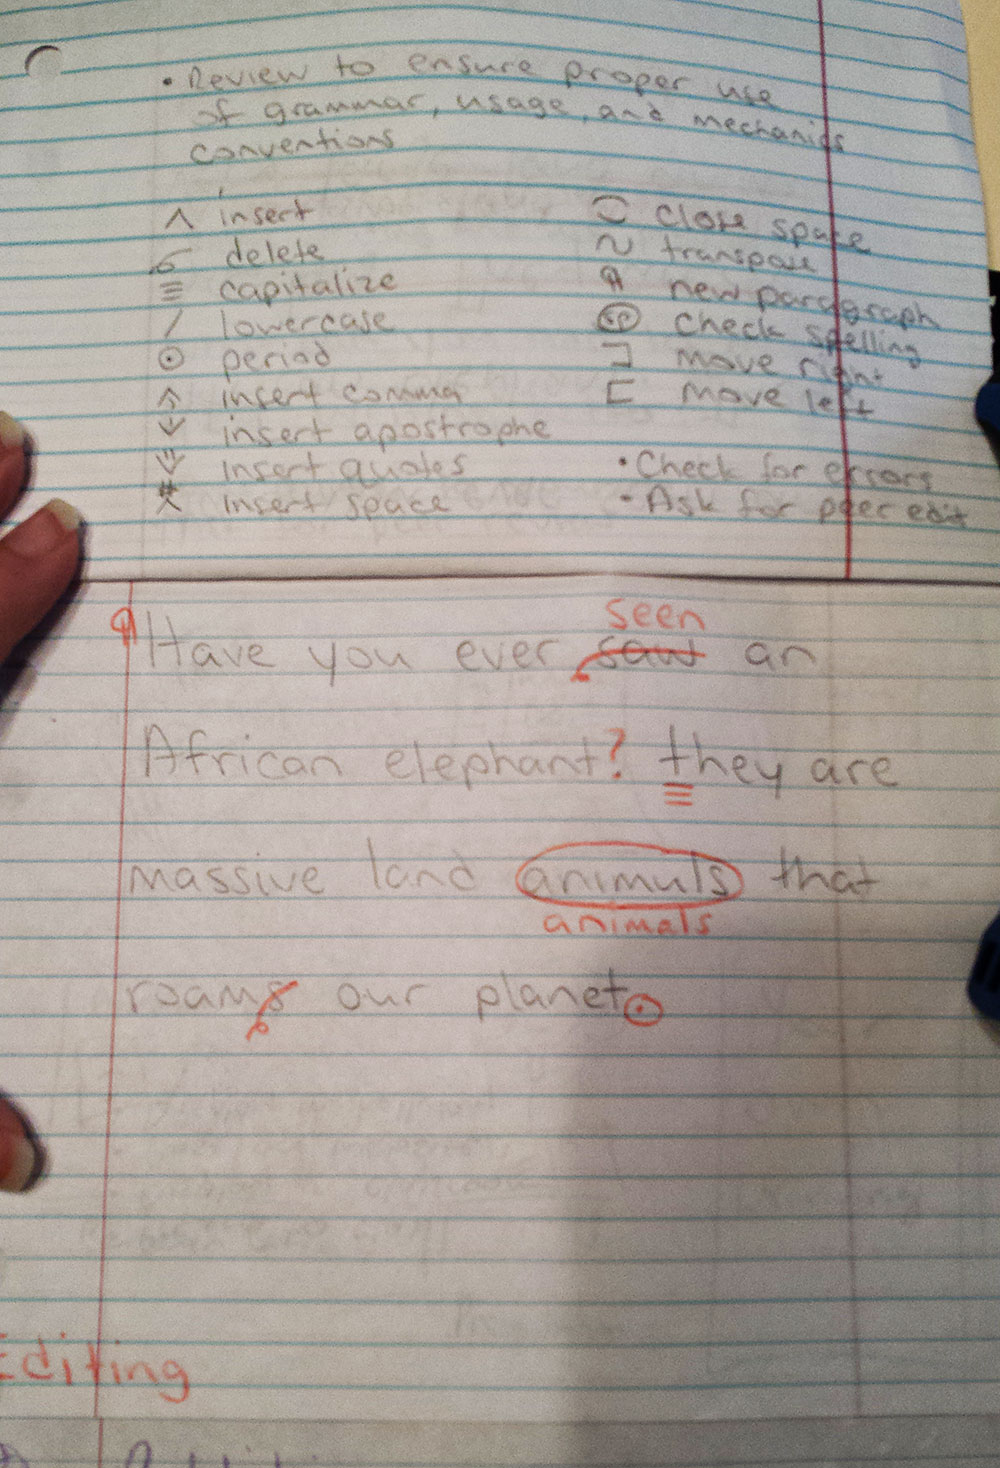
Students also tend to think of the editing process as being one step. The video below shows how one author goes through multiple editing and revising steps.
Debra Frasier discusses her editing process (video)
Publishing
While this is the most important stage of the writing process, it’s also the one that tends to get ignored. Schedules are hectic, teachers are busy, and we just tend to take things home to grade, then hand back. But the prospect of having one’s writing read (and responded to) by an authentic audience, the thrill of having one’s work displayed for the world to see is often the springboard students need to see their writing as valuable, and more than just a random school assignment.
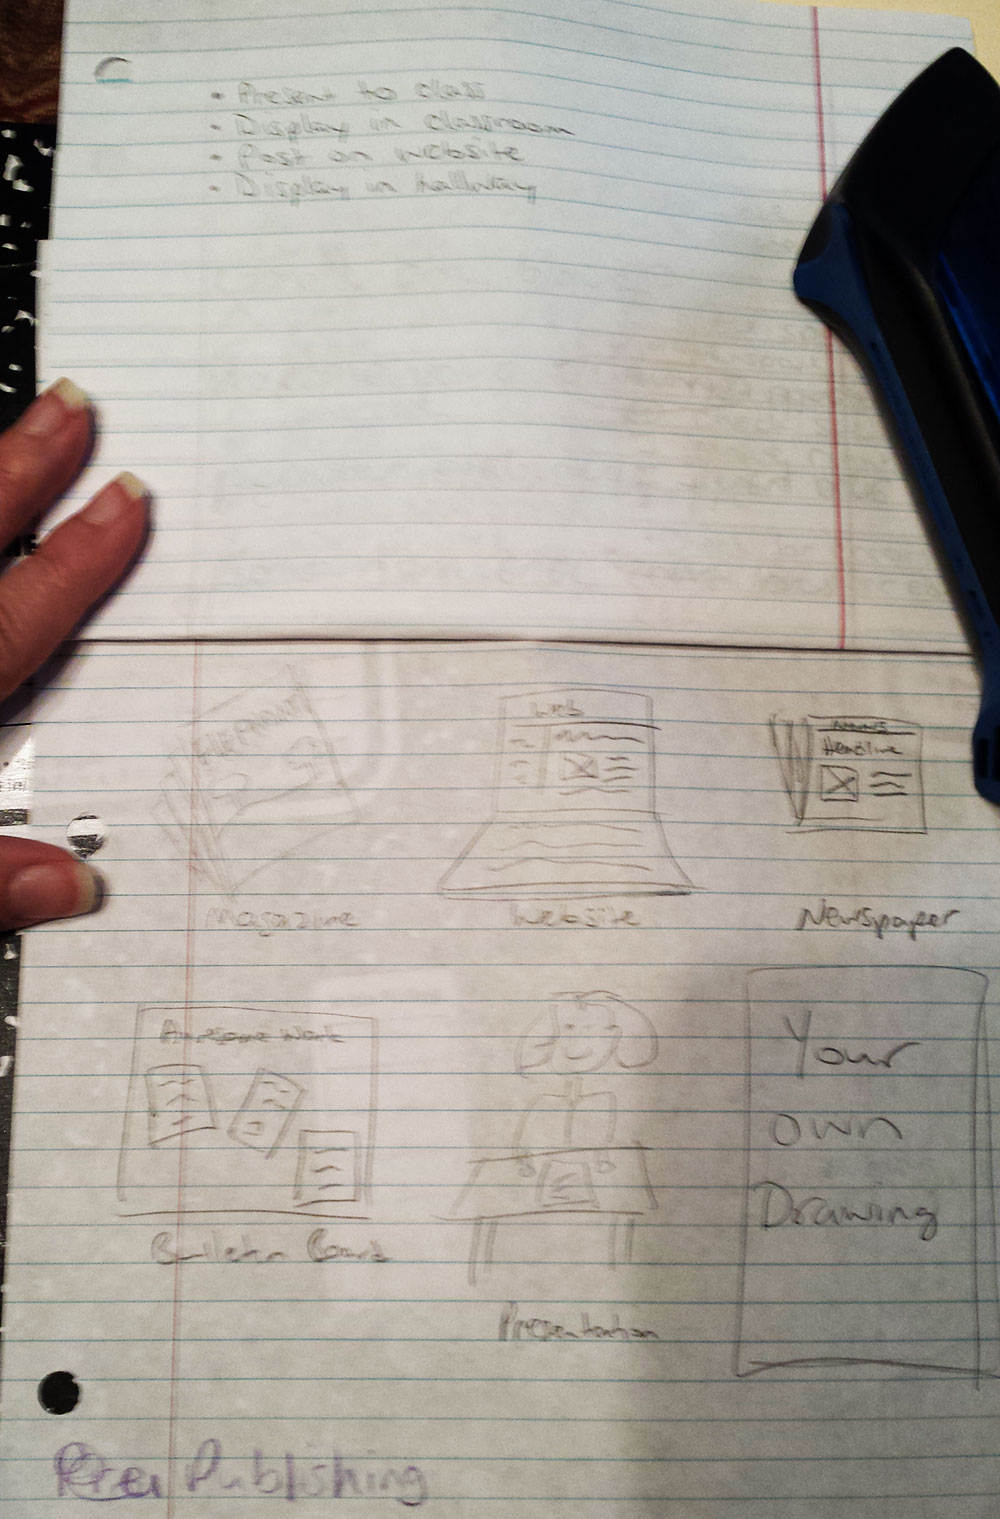
At the end of this step, I ask students to think of ways that they can publish their work (and then draw their idea as the sixth image on the publishing page). Once we have finished our flip charts, we’ll refer to them as we write our Dream Catcher Essays, which I’ll discuss in the near future.

Thank you for making this website, Mrs. Waters! I’m glad I didn’t have to do this, that, and the other just to get my work done!
Thank you, Ava! I’m glad my website helped you.